9.3. Uploading a Video#
Uploading a video and transcript is different depending on whether your course is on Upskilled or Edge.
For more information, see the following topics.
9.3.1. Uploading a Video for an Upskilled Course#
Note
This information applies only to courses that run on the Upskilled site. For information about adding video files to courses that run on Edge, see Uploading a Video for an Edge Course.
For Upskilled courses, you upload your videos to the Video Uploads page. The Upskilled video process then creates multiple formats and sources for your videos.
For more information, see the following topics.
9.3.1.1. Automated Video Process#
So that the Upskilled video player can automatically play videos in the best format for a learner’s device and internet connection, after you upload a video for an Upskilled course, an automated video process creates multiple formats and sources for every video. The process also assigns a single video ID to the video that represents all of the formats and hosting locations for the video.
For courses that have integrated transcripts through 3Play Media or cielo24, the Upskilled automated video process also creates transcripts for each video.
For courses that have non-integrated transcripts, you must obtain your transcripts from your third party provider. You later add the video transcripts manually when you create a video component.
Note
If a step in the process does not complete successfully, the process automatically tries again multiple times. If the process does not complete successfully after multiple tries, an error status appears in the list of videos on the Video Uploads page.
For more information, see the following topics.
9.3.1.1.1. Automated Video Process for Integrated Transcripts#
If the course has integrated video transcripts through 3Play Media or cielo24, the process has the following steps.
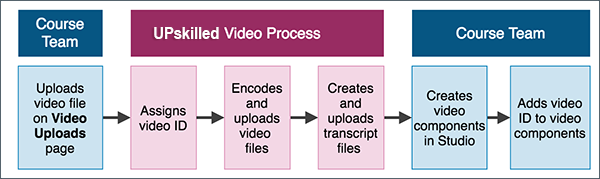
The course team uploads the video file on the Video Uploads page.
The process assigns a unique video ID to the video. This video ID represents all of the files, hosting locations, and transcripts that the automated process creates.
Important
As soon as the automated video process has assigned a video ID to the video, you can add the video to the course. However, the video is not visible in the course until the automated process is complete. The process can take up to 24 hours.
The process encodes video files in different formats, and then uploads the video files to the hosting service.
The process creates transcripts for the video, and then uploads the transcripts to the hosting service.
After the automated video process is complete, the course team creates a video component and adds the video ID to the video component.
9.3.1.1.2. Automated Video Process for Non-Integrated Transcripts#
If the course uses a transcript provider that does not offer integrated transcripts, the video processing service completes the following steps.
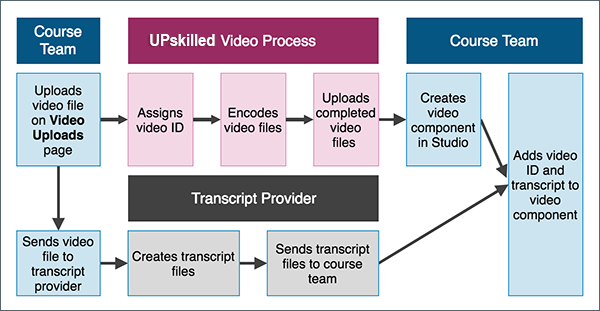
The course team uploads the video file on the Video Uploads page.
The process assigns a unique video ID to the video. This video ID represents all of the files and hosting locations that the automated process creates.
Important
As soon as the automated video process has assigned a video ID to the video, you can add the video to the course. However, the video is not visible in the course until the automated process is complete. The process can take up to 24 hours.
The process encodes video files in different formats.
The process uploads the video files to the hosting service.
Either before or after the course team uploads a video on the Video Uploads page, the course team obtains transcripts from a transcript provider. When the Upskilled video process is complete, and the course team has obtained transcripts from the transcript provider, the course team creates a video component and adds the video ID and transcript to the component.
9.3.1.2. Upload a Video for an Upskilled Course#
To upload video files, both for videos with integrated transcripts and non-integrated transcripts, follow these steps.
Important
You must leave the Video Uploads page open in your browser until the upload process is complete for all files.
Open the course in Studio.
On the Content menu, select Video Uploads.
Add video files to the Video Uploads page. You can drag files to the page and drop them, or select Browse your computer to locate the files to upload.
A rectangular tile appears on the page for each file and shows the following information.
The video file name.
A progress bar.
The status of the file upload process.
When the file has been successfully uploaded, the tile disappears, and an entry for the video appears under Previous Uploads with a status of “Uploaded”.
(optional) Specify a thumbnail image for the video. The thumbnail image is the image that learners see before the video begins to play. To do this, hover the cursor over Add Thumbnail, select an image from your computer, and then select Open.
If a thumbnail image exists for the video and you want to change the image, hover the cursor over the image, and then select Edit Thumbnail. Select an image from your computer, and then select Open.
After you have uploaded video files, the Upskilled video process begins. You can check the progress of a video file through the service at any time. For more information, see Monitor Video Processing or Downloading the Available Encodings Report.
9.3.1.3. Monitor Video Processing#
After your video files are successfully uploaded, the video processing service begins.
Note
This service takes up to 24 hours to complete.
A list of every file that you attempt to upload to the Upskilled servers appears in the Previous Uploads section of the Video Uploads page. The list includes each file’s status in the encoding and hosting workflow. In addition, you can download a report of the video files that you uploaded. For more information, see Downloading the Available Encodings Report.
9.3.1.3.1. Video Processing Statuses#
The encoding and hosting process assigns the following statuses to video files.
Status |
Description |
|---|---|
Failed |
Files did not complete processing successfully. If this status appears, follow these steps.
There might be failure instances where a
small error message will be displayed
under the Failed status. In
most of the cases when the error message is
displayed, there
is a possibility of corruption in the uploaded
file (either during the upload or the original
video file itself). However, if processing
fails more than one time for a file, contact
Upskilled partner
support at |
Failed Duplicate |
Files failed to upload because the system identified the files as duplicates. |
In Progress |
Files are undergoing processing to create additional file formats, or are waiting for successful transfer to the host sites. |
Invalid Token |
A configuration problem has occurred. If
this status appears, contact Upskilled
partner support at |
Ready |
The encoding process is complete for your files. When you click the names of these files, a file on one of the external host sites plays. The encoding process might take 24 hours after you upload a file. Note For all courses, the “Ready” status means that the encoding process is complete. It does not refer to the transcript creation process. For courses that have integrated transcripts through 3Play Media or cielo24, the video is not ready for you to add to the course, or for learners to view, until the “Ready” status changes to “Transcript Ready”, signifying that the transcript creation process is complete. For courses that do not have integrated transcripts, you must make sure that each video has a transcript. For more information, see Non-Integrated Transcripts. |
Transcription in Progress |
The encoding process has completed, and video transcripts are being created. If a video has this status longer than the time that you specified for the Transcript Turnaround time, follow these steps.
If this problem occurs more than one time for
a file, contact Upskilled partner
support at |
Transcript Ready |
Both the video encoding and transcript creation processes are complete. The video and transcripts are ready to add to your course and for learners to view. |
Partial Failure |
This status appears when the transcription process has been started for more than one languages and either one or more processes fail. This indicate a combination of successful and unsuccessful transcription processes. |
Transcript Failed |
All the transcription processes have failed. |
Unknown |
A configuration problem has occurred. If
this status appears, contact Upskilled
partner support at |
Uploaded |
The file has successfully completed uploading to the Upskilled servers. |
Uploading |
The file has not yet reached the Upskilled servers. If a video has this status for more than 48 hours, follow these steps.
If this problem occurs more than one time for
a file, contact Upskilled partner
support at |
9.3.1.3.2. Downloading the Available Encodings Report#
The Available Encodings report is a comma separated values (.csv) file that provides detailed information about the video files that you have uploaded. This report includes the status of the encoding and hosting process for each video file that you have uploaded, the identifier for the video, and the URLs for each encoding format. The Upskilled encoding and hosting process produces these alternative formats to ensure optimal playback quality for your learners.
You can view the Available Encodings report in a spreadsheet application or text editor.
To download the Available Encodings report, follow these steps.
Open the course in Studio.
On the Content menu, select Video Uploads.
On the Video Uploads page, click Download available encodings (.csv).
Use a spreadsheet application or text editor to open the .csv file.
The .csv file includes the following columns.
The file Name.
The file Duration. If the upload process has not yet determined how long the file is, Pending appears in the Duration column for a video.
The Date Added, which shows the date and time that you uploaded the video file.
The unique, identifying Video ID. When you add a video component to your course, you supply the video ID for the file you want to add.
The Status of the encoding and hosting process for the file. For more information, see Video Processing Statuses.
The .csv file also includes a column for each of the formats that are the result of the Upskilled encoding and hosting process. These columns include the URL of a host site only after the format is successfully generated and delivered to its destination.
desktop_mp4 URL: The location of a 720p resolution video file in .mp4 format. Learners who view course videos with mp4 players view this file.
desktop_webm URL: The location of a 720p resolution video file in .webm format. Learners who view course videos with webm players view this file.
Note
The encoding and hosting process no longer creates .webm versions of the video files that you upload. Modern web browsers do not require the webm format. The .csv file includes the desktop_webm URL column to show the webm URLs for videos uploaded before this change. When you upload a new video, the column will remain empty, even after the encoding and hosting process is complete.
mobile_low URL: The location of a 360p resolution video file. Learners who download and view course videos on mobile devices view this file.
youtube URL: Upskilled no longer supports YouTube videos.
9.3.1.4. Remove Videos from the Video Uploads Page#
A list of every file that has been uploaded to the Upskilled servers appears in the Previous Uploads section of the Video Uploads page. You can remove videos from the Previous Uploads list without affecting course content that uses the video ID of successfully uploaded videos.
To remove a video from the Previous Uploads list, follow these steps.
Open the course in Studio.
On the Content menu, select Video Uploads.
In the Previous Uploads list, locate the row for the video that you want to remove, then select the “X” icon in the Action column.
In the confirmation dialog box that appears, select Remove to remove the video.
The selected video is removed from the Previous Uploads list. Course content that uses the video ID of the removed video is not affected.
9.3.2. Uploading a Video for an Edge Course#
Note
This information applies only to courses that run on Edge. For information about uploading videos to courses that run on Upskilled, see Uploading a Video for an Upskilled Course.
For Edge courses, you upload your videos to the third party hosting site that you selected. You also obtain the transcripts for the videos from your third party provider. You add the video location and transcripts manually when you create a video component.
To upload a video to a third party hosting site, follow the instructions for that site. Keep the following guidelines in mind.
The URL for the video that you upload on a third party hosting site must end in .mp4, .mpeg, .webm, or .ogg. The video player cannot support videos that you upload on sites such as Vimeo, Dailymotion, or other sites that use their own player.
To help make sure all standard browsers can play your video, Upskilled strongly recommends that you use .mp4 format.
The video URL might resemble the following example.
https://s3.amazonaws.com/Upskilled-course-videos/Upskilled-Upskilled101/UpskilledSPCPJSP13-G030300.mp4If you have copies of a video in multiple resolutions, you must upload each copy to the hosting site. For more information, see General Guidelines.
After you upload a video on a hosting site, you must make sure you have the URL for that copy of the video. If you upload copies of your video on more than one hosting site, make sure you have the URL for each video location.
For more information about hosting your videos, see Set Up a Hosting Service.